नमस्कार दोस्तों, अक्सर नये Blogger द्वारा यह सवाल किया जाता है की अपने Blog को Google Search Console में कैसे Add करें! (Blog ko Google Search Console me Kaise Add Kare) या अपने Blog को Google Search Engine में Verify कैसे करें!
यदि आप भी अपने Website को Google से जोड़ना चाहते है! तो इस पोस्ट में आज आपको अपने Blog या Website को Google Search Console में कैसे Add करें Step by Step बताने वाला हूँ! तो कृपया इस पोस्ट को पूरा पढ़े!
आप Google Search Console Tool को अच्छे से समझना चाहते है! और गूगल के इस बिल्कुल Free Webmaster Tool के सारे Services और Features का फायदा लेना चाहते है तो इससे पिछले Hindi Blog में हमने आपको Google Search Console क्या है के बारे में बताया था! इस Blog को जरूर पढ़े!
Google Search Console की सहायता से आप अपने Blog या Website के Performance को Real Time में Monitor कर सकते है! मतलब Google Search Engine में आपकी Website कैसा प्रदर्शन कर रही है! इसके साथ – साथ आप Google Search Console से अपने Website के Sitemap को भी Google में Submit कर सकते है!

[ अपने Blog को Google Search Console में कैसे Add करें – Blog ko Google Search Console me Kaise Add kare ]
Performance के साथ साथ यदि आपके Website में किसी प्रकार का कोई Error Generate होता है! तो उसकी भी जानकारी आपको मिल जाती है! इसके अलावा आप Website के Top Ranking Keywords, Impression और Sitemap को भी Google Search Console से Check और Manage कर सकते है!
अपने Blog को Google Search Console में कैसे Add करें?
Blog ko Google Search Console me Kaise Add kare: यदि आप अपने Blog या Website को Google Search Console में Add करना चाहते है! तो आपको निचे दिये गये 3 Steps Follow करना है! जिससे आप बहुत आसानी से Google Search Console में अपने Blog को Add (शामिल) कर सकते है! और Verification को पूरा कर सकते है!
Step 1.
सबसे पहले अपने Blog को Google Search Console में Add करने के लिए किसी Browser को Open करके Google Search Console Search कीजिये या आप इस Google Search Console Link पर Click करके सीधे इस Webmaster Tool पर Visit कर सकते है!
Step 2.
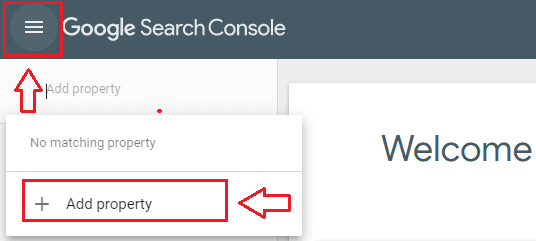
उसके बाद Google Search Console में अपनी E-Mail Id से अपना एक Account बना लीजिये और फिर Left Side में Top पर Main menu में Click करके + Add Property को Select कर लीजिये!
Step 3.
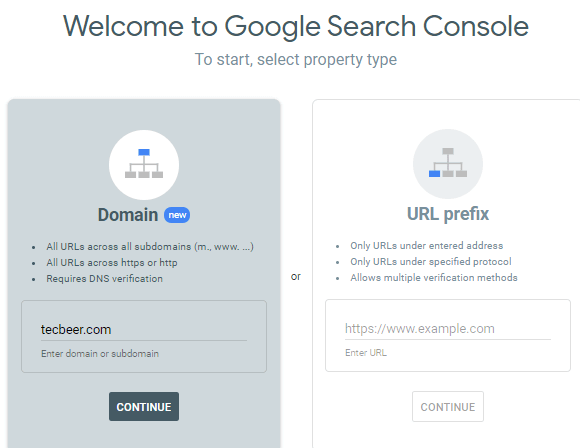
इसके बाद आपको Website को Add करने के लिए 2 Method दिखाई देती है! जिसमे से किसी भी एक Method का उपयोग करके आप अपने Website को Google Search Console में Add कर सकते है! पहला Domain और दूसरा URL Prefix तो चलिये इन्हे समझते है!
| 1. | Via Domain |
| 2. | Via URL Prefix |
Method 1. Via Domain
यदि आप पहला Option अर्थात Domain Level से Website को Google Search Console में Add करना चाहते है! तो सबसे पहले Domain Option को Select कीजिये! फिर अपने Website (Domain or Subdomain) का Enter कीजिये और Continue में Click कीजिये! (चित्रानुसार)
अब अपने Screen में दिखाई दे रहे TXT Record को Copy कर लीजिये!
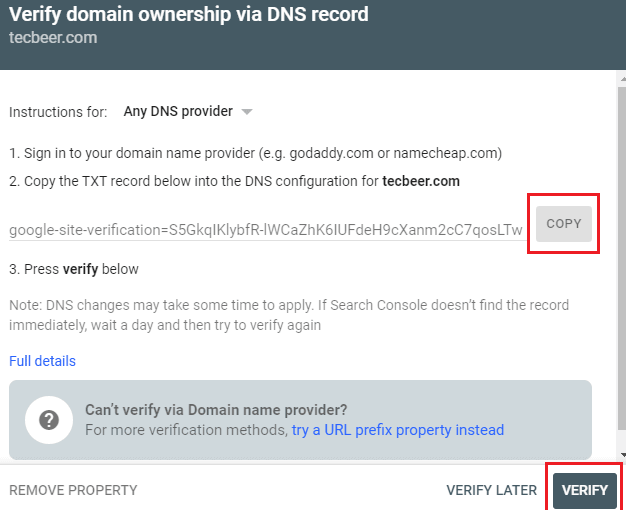
इसके बाद अपने Domain Provider जैसे- godaddy.com पर sign in कीजिये और DNS Setting में Zone Record पर जाइये! जहा पर Add Record में Click करके Copy किये हुए TXT Record को add कीजिये!

फिर Google Search Console में जाकर Verify के बटन में Click कर लीजिये! इस Domain Verification में कुछ समय लग सकता है!
Method 2. Via URL Prefix
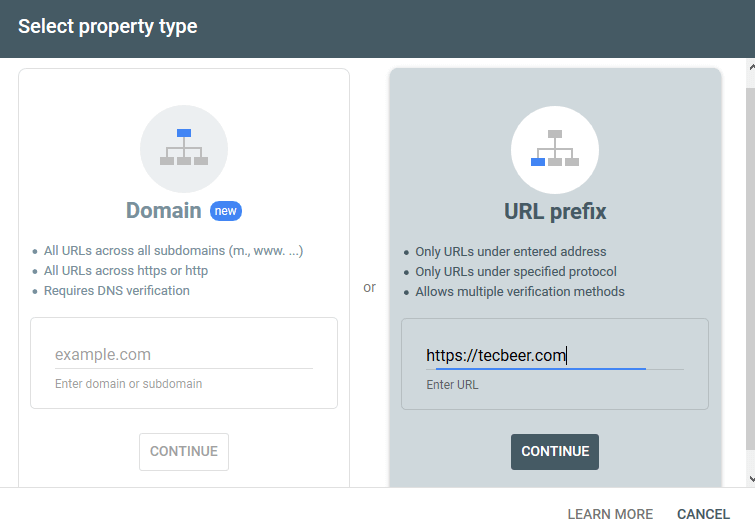
सबसे पहले URL Prefix Tab को Select कीजिये फिर अपने Blog Website का URL जैसे – http://tecbeer.com या https://tecbeer.com Enter URL Option में Enter करके Continue बटन में Click कीजिये!
Note: Continue करने से पहले एक बार चेक कर ले की आपने अपने Blog Website का URL तो सही Enter किया है!
HTML File से Verification
अब आपको नये Screen में एक HTMl File दिखाई दे रही है! जिसे आपको Download करके अपने Website में Upload करना है! और ध्यान रहे की Google Search Console में Verified रहने के लिए इसे Website में से कभी Remove न करे!
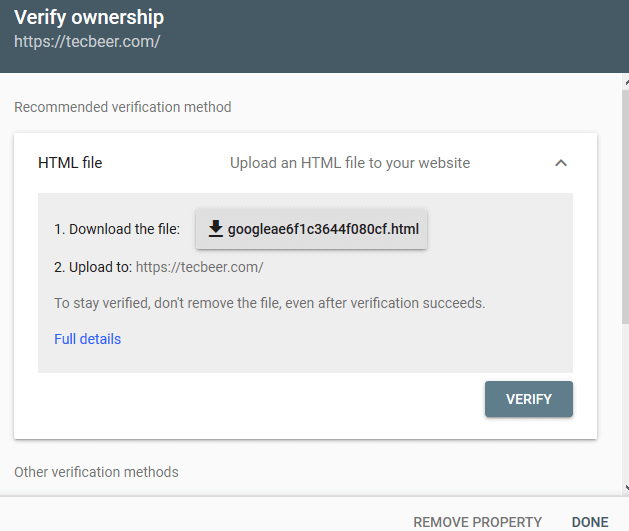
तो इस File को Download कर लीजिए और अपने Website में Upload कर लीजिये!
Note: आपको बता दे, HTML File के अलावा आप अन्य विधियों से भी अपने Blog Website का Verification पूरा कर सकते है!
| 1. | HTML file | Upload an HTML file to your website |
| 2. | HTML tag | Add a meta tag to your site’s home page |
| 3. | Google Analytics | Use your Google Analytics account |
| 4. | Google Tag Manager | Use your Google Tag Manager account |
| 5. | Domain name provider | Associate a DNS record with Google |
HTML Tag से Verification
यदि आप अपने Blog Website में Yoast SEO Plugin का उपयोग कर रहे है तो आप HTML Tag से अपने Website को आसानी से Verify कर सकते है!
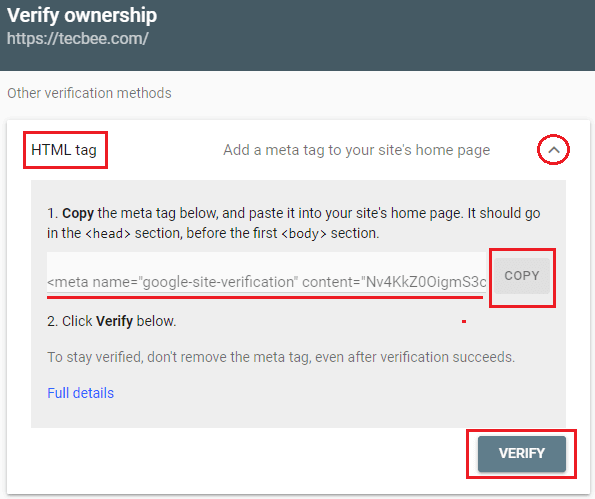
आपके लिए Yoast SEO Plugin इस प्रक्रिया को और भी आसान बना देता है! इसके लिए आप Yoast Plugin के Setting में General Option फिर Webmaster Tools Option में जाकर Google Verification Code के स्थान पर HTML Tag को Past करके Save कर लीजिये!
SEO >> General >> Webmaster Tools >> Google Verification Code >> Save
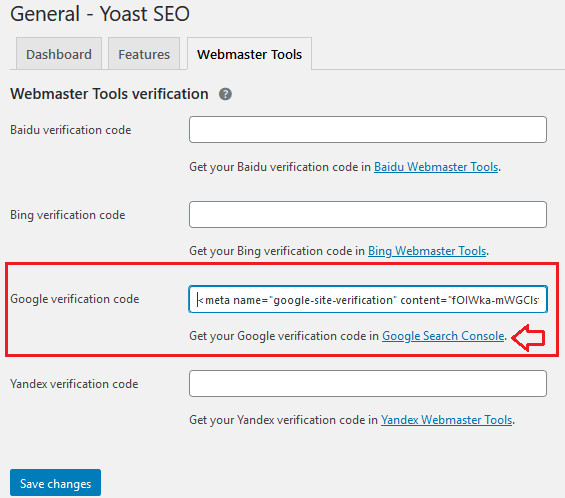
इसके बाद फिर से आप Google Search Console में जाकर Verify के बटन में Click कर लीजिये! आपको बता दे इस Verification में भी कुछ समय लग सकता है!
कुछ समय में आपको Verification Verified का Messages दिखाई देता है! इसके अलावा आप Setting में जाकर Ownership Verification पर Click करके भी Check कर सकते है!
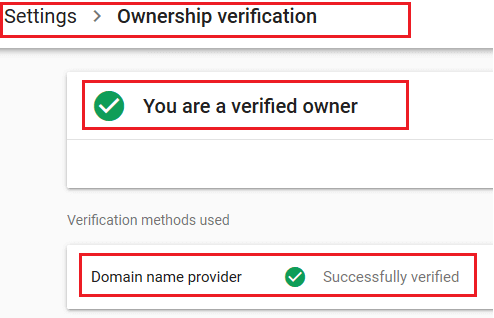
इस तरह आप Google Search Console में अपने Blog को बड़ी आसानी से Add कर सकते है और Google के इस Free Service का फायदा ले सकते है!
Conclusion [ निष्कर्ष ]
आज के इस Post में हमने आपकोअपने Blog को Google Search Console में कैसे Add करें (Blog ko Google Search Console me Kaise Add Kare) या अपने Blog को Google Search Engine में Verify कैसे करें के बारे में बताया!
आशा करता हूँ आपको यह हिंदी पोस्ट Blog ko Google Search Console me Kaise Add Kare से बहुत कुछ जानने को मिला होगा! यदि आपको यह पोस्ट पसंद आयी तो कृपया Like बटन दबाकर हमे अवगत कराये! और अगर किसी प्रकार का कोई सवाल या सुझाव आप हमे देना चाहते है तो निचे Comment Section में Comment करके जरूर बताये!
इस तरह की और भी जानकारी सबसे पहले पाने के लिए आपके अपने इस Hindi Blogको अवश्य Subscribe कर लें!
पूरा पोस्ट पढ़ने के लिए आपका बहुत बहुत धन्यवाद!
